I have been schooled. I attended the Becky Tate School of Google Forms. If you know Becky Tate, the yearbook adviser of Shawnee Mission North High School in Shawnee, Kansas, or if you know me, you understand that getting us to focus long enough to teach each other something is a miracle. But we did manage to focus – or it could be that Google Forms is just that easy.
Using Google Forms during the 2021 school year could be a life saver. It will not only collect emails, quotes, surveys, stories and/or photos, it will also create a spreadsheet for the staff, allow viewing/sharing/editing for all members and provide the staff with as much documentation as they need.
Getting started is super easy because the platform is so intuitive. Go to google.com/forms to get started, or find the Forms tab under More options in your Google account. You can easily find plenty of helpful video tutorials on YouTube like this tutorial that will teach you everything you need to know in less than 20 minutes.
How will Google Forms help you this year?
With the various optional attendance formats schools are taking during this fall, Google Forms will help advisers gather information from students who may or may not be on campus. You can easily crowdsource story, photo and quote ideas. You may want to:
- Do a story on the first days of classes
- Do a story on teachers who have kids at home and have to help them as well as teach their classes
- Do a story on the kids who dress up for online meetings/classes
- Do a story on the super active students who walk or work out during online classes
The possibilities are endless, so dream big and get creative.
How to use the forms
If you’ve never played around with these Forms before, they are super simple. You’ll see options for each question on the type of response (short answer, multiple response, etc.), whether it’s required or not, adding images, etc. Learn the Forms setup, set up a sample document and think about your desired results. You will want to learn how to use the sections that let a specific answer send the respondent to a new set of questions. If that sounds confusing, just Google it – it’s how we figured it out after other teachers told me about it.
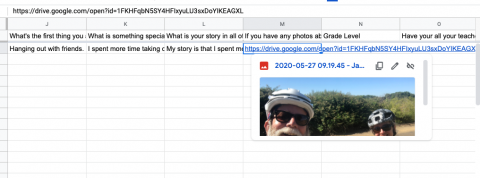
Consider the purpose of your survey before sending it out. Is the survey a way to gather information? You will want to be able to capture the feedback, as well as email and contact information for everyone who responds. Will your audience give full-blown answers, or will they simply click on the desired choice? Will you want to collect images?  You should, and you will need to set the form to collect large files – you want high-res images. The responses will show a link to a Google Drive folder for that image. When you click on that link, you can see the photo. The best part is the collection will label the photo with the student and as much information as you need to write captions. You will even gather the photographer. The naming convention includes the name of the person who submitted it, so photo credits just got a whole lot easier!
A good rule of thumb is to keep your survey short. If it becomes lengthy, your readers may decide not to complete it. With Google Forms, you can keep the questions to just a few per page to answer prior to seeing the next page. You can easily divide up a lengthy survey into part 1, part 2 or even part 3.
Once you set up your survey, you will be able to send the form directly to your audience or send to other teachers, who in turn can also send to their classes.
When you open the Google Form you’ve made, you will have three choices.
- Look at the questions.
- Look at the responses. When you have more than one response, you can use the arrow at the top of the form to scroll through each individual’s responses.
- Click on the green spreadsheet in the upper right, and a spreadsheet will be created with all the information gathered from all respondents.
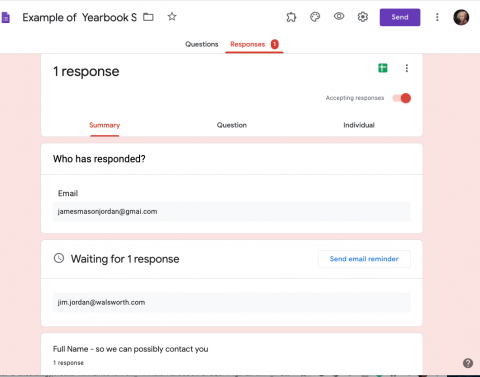
If you select the spreadsheet, you have two formatting options. You can choose the option that you like best. I don’t make the spreadsheet until I’ve closed the Form (survey) so that I know I have received all my responses and have complete data to work with. Your spreadsheet collects time, date, email address, name and everything you asked about on the form. This will be helpful if you need to go back for any follow up. Get a great response? You’ve got the student’s name and contact info, so now you can go back and ask for them for a quote, photo of themselves or additional info.
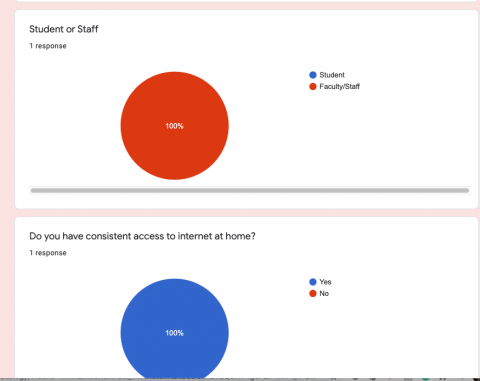 Google Forms will figure percentages for you for different responses, making for easy modular coverage and a great way to get even more kids into the book, each of whom will then want to buy a yearbook. You can also easily turn a survey into a quiz if you would like. This could be a great idea if you are sending the survey to other teachers. They can send the survey out as a quiz to their students for an easy assignment, and it gives them an additional chance to add points into the gradebook.
I hope this helps a little. Becky used this to crowdsource some great images and stories that she would not have found otherwise – more than she was able to use because she ran out of room – and I know you can too.
See for Yourself
Here’s an actual example of a Google Form that you could use. Walsworth Yearbooks rep Lori Mortland, CJE, designed this for a Walsworth webinar to show how seniors could use this to submit info to be included with their senior portraits, but you could easily adapt it to fit your needs. It’s simple and straightforward but still comprehensive enough to get all of the information you need, including a photo.

